HOT LINE: 086-577-65159218
HOT LINE: 086-577-65159218

INDUSTRY NEWS
INDUSTRY NEWS
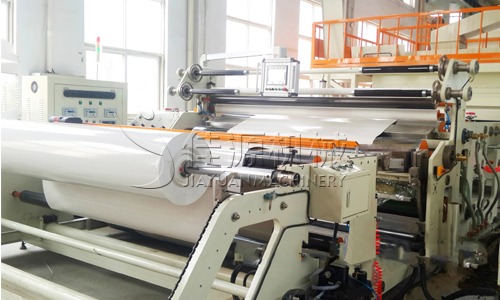
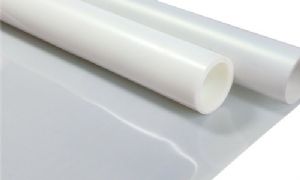
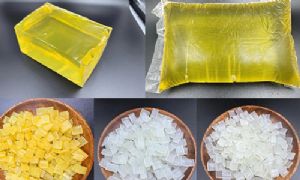
Product Description: HDPE polymer self-adhesive waterproofing membrane is a new type of polymer waterproofing membrane manufactured by thermally laminating a modified high-density polyethylene (HDPE) substrate with a non-asphalt-based polymer self-adhesive layer; the separation layer is made from special-grade sand particles or an ageing-resistant polyethylene silicone oil film. Before the initial setting of the cast-in-place concrete, the concrete gradually interlocks with the membrane's self-adhesive layer under the influence of gravity. During the cement curing process, physical adsorption and interlocking effects occur, ensuring the membrane adheres firmly to the cast-in-place concrete and is resistant to detachment. 2 Product Advantages 1. High peel strength and full adhesion to the substrate; 2. Strong resistance to chemical corrosion; 3. Excellent impact and puncture resistance; 4. Self-adhesive pressure-sensitive adhesive layer with strong self-healing properties; 5. Convenient and efficient installation; 6. Quick and easy maintenance. 3 Key Construction Steps: Substrate preparation → Membrane laying → Localised fixing of the membrane → Membrane lap joints → Sealing of joints → Organisation of inspection → Reinforcement tying, concrete pouring, and construction of subsequent structural layers 1
Substrate Preparation: Remove all debris. Any sharp protrusions on the substrate must be levelled; the substrate need only be generally level. If standing water is present, it should be swept away before proceeding; the substrate may be slightly damp. 2
Laying the Membrane: Lay the membrane with the granulated side facing upwards, using a rolling method to loosely lay the membrane over the underlay. After the first sheet is laid, lay the second sheet. When laying adjacent sheets, ensure the overlap edges are aligned to prevent misalignment affecting the joint. 3
Partial Fixing of Membranes on Damp Substrates: Use nail guns and washers to fix 10 cm square HDPE waterproofing membrane patches (with a non-granular anti-adhesive layer) to the substrate. Then lay the main waterproofing membrane over these patches and roll over the area to ensure the self-adhesive layer on the membrane patches bonds firmly to the main waterproofing membrane. Dry substrate: Peel off the release film from one side of the polymer double-sided self-adhesive tape and apply the tape directly to the substrate. After peeling off the release film from the other side of the tape, lay the main waterproofing membrane directly onto the tape and roll it to ensure a secure bond. Vertical surface installation: When installing on vertical surfaces, the self-adhesive edges (within 10–20 mm of the membrane edge) must be mechanically secured using nail guns and washers. The spacing between nails should ideally be 400–600 mm. When laying the next sheet, ensure that it completely covers the nail holes. 4
Sheet overlaps Long-edge overlap: After removing the release film from the overlapping edges of the sheets, overlap them directly and roll them down firmly; the overlap width must be no less than 80 mm. Short-edge overlap: ① Use HDPE (sand-free) waterproofing sheets (i.e. adhesive sheets) as jointing material. Cut the sheets into strips 140 mm wide and place them with the self-adhesive side facing upwards. ② Using a utility knife, gently score the release film along the centreline of the jointing material, taking care not to damage the membrane. Peel off the release film from both sides in turn. ③ Overlap the short edges directly with the preceding and following sheets, and roll firmly to ensure a secure bond. Before joining, adjust the position of the preceding and following sheets to ensure the main sheet is laid straight. Note: The short-edge joints of adjacent rows of sheets should be staggered by at least 300 mm to prevent overlapping of multiple joints, which could result in uneven adhesion. 5
Sealing of Joints and Details: No additional layers are required for the internal and external corners or joints of the HDPE waterproofing membrane. However, once the main membrane has been laid, the integrity and watertightness of detailed construction elements such as joints must be inspected and addressed. For detailed joints on the basement floor slab, such as pile heads, anchor bolts, drainage wells and crane bases, these should be secured with adhesive tape and treated with a sealing compound. 6
Organise an inspection: Once the waterproofing work has been completed, an inspection shall be organised.
Once the waterproofing layer has been completed, the reinforcement can be tied and the concrete poured. After pouring the concrete, it must be thoroughly compacted to ensure that the concrete bonds fully with the waterproofing layer, thereby enhancing the waterproofing performance. 4. Construction Precautions 1. The principle of construction sequence is: joints first, then large areas; lower areas first, then higher areas; high spans first, then low spans; distant areas first, then nearby areas. The main sheet material may only be laid after all additional layers at junctions have been installed. When adhering the main sheet material, work must proceed from low to high; furthermore, operatives must avoid excessive foot traffic on the completed sheet waterproofing layer. Necessary and conspicuous protective measures must be implemented in the construction area (with necessary access routes provided around the perimeter), and unauthorised personnel are prohibited from walking or trampling on the area. 2. Joint Locations
At turning points such as excavation pits and foundation pit corners, joints in membranes on horizontal, vertical (or sloping) surfaces should, where possible, be located on horizontal planes; the treatment of corner areas should be kept as uniform and neat as possible. 3. Fire Safety Requirements
As the HDPE membrane waterproofing layer is installed using cold application methods, open flames of any kind are strictly prohibited once materials have been brought to the work area. Should sparks be generated, for example, from steel reinforcement welding, the membrane surface exposed to the welding must be doused with water or temporary protective measures must be put in place. 4. Protection of the Finished Work
Once the membrane has been laid, care must be taken to protect it. Reinforcement cages must be placed gently and must not be dragged across the waterproofing layer to avoid damage. If a pry bar is required to move reinforcement bars during tying, a wooden pad should be placed underneath as temporary protection to minimise damage to the waterproofing membrane. 5. Repair of Damage
Should the waterproofing layer be inadvertently damaged during subsequent construction work, cut a 100mm × 100mm patch from the membrane (rounding the corners of the square patch) according to the extent of the damage, and use high-molecular-weight double-sided self-adhesive tape to secure it over the damaged area.

Tel: 086-577-65159218
Email: jaynn@jaynn.com
Add: No.1,Area C,Wandong Intelligent Manufacturing Industrial Park,Zhejiang Province,China.
SUBSCRIBE
Get the latest updates in real-time


Scan WeChat

Scan Tiktok